Uploading files using the API
This guide will show you an example on how to upload files using the BluFiles API.
Prerequisites
Before you can upload files using the API, you need to have an API token included in your Authorization request header. See Setting up and using an API token for more information on how to generate a token.
Uploading a file as a multipart request
To upload a file, you can use the following endpoint: POSTUpload file
This endpoint accepts a Content-Type: multipart/form-data request with the following parameters:
name: The name of the file. This is required.folderId: The ID of the folder to upload the file to. This is optional, and if not provided, the file will be uploaded to the root folder.share: Whether to share the file after uploading. The share link ID will be added to the response as the propertyshareId. This is optional, and defaults tofalse.data: The file to upload. This is required.
Here is an example response from the API after uploading a file:
{
  "id": "cmmm4l5900001356nk5k9bwjv",
  "name": "Test.png", // file name
  "mime": "image/png", // detected MIME type
  "size": "25611", // file size in bytes
  "ownerId": "cmmm4l7710002356nhts4emo0",
  "folderId": null, // folder ID if the file is uploaded to a folder, null if uploaded to root
  "createdAt": "2026-03-11T14:16:25.966Z",
  "updatedAt": "2026-03-11T14:16:25.966Z",
  "shareId": "cmmm4ladt0003356nf1aeafi2" // share link ID if the file is shared, null if not shared
}
If share is set to true, a share will be created for the file, and the shareId property will be included in the response. To construct the share link URL, you can use the following format:
https://files.bludood.com/s/<shareId>In the example response above, the share link URL would be https://files.bludood.com/s/cmmm4ladt0003356nf1aeafi2.
Using ShareX
You can set up BluFiles as a custom uploader in ShareX to easily upload files using the API.
BluFiles has an integrated snippet generator which can automatically generate a custom ShareX uploader for you based on your API token. See the Generating Snippets guide for more information on this.
You can also manually create a configuration for ShareX like this:
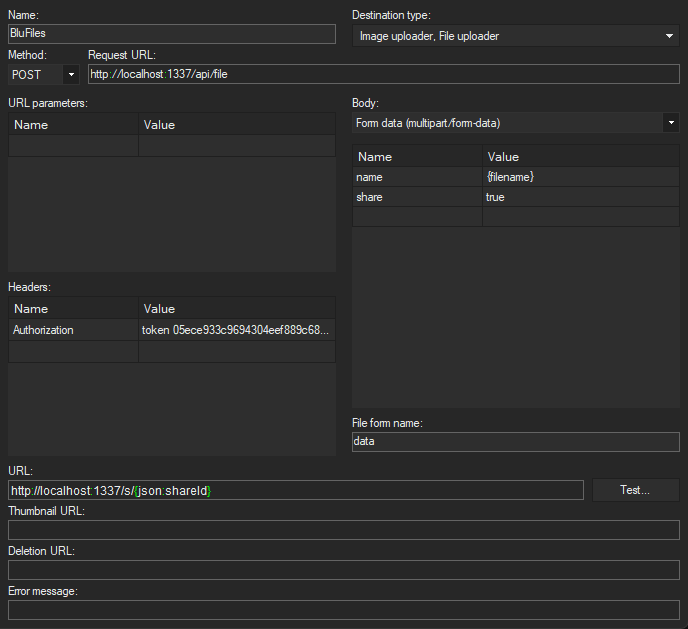
Here is an example of a JSON config for the custom uploader:
{
  "Version": "18.0.1",
  "Name": "BluFiles",
  "DestinationType": "ImageUploader, FileUploader",
  "RequestMethod": "POST",
  "RequestURL": "http://files.bludood.com/api/file",
  "Headers": {
    "Authorization": "token <generated API token>"
  },
  "Body": "MultipartFormData",
  "Arguments": {
    "name": "{filename}",
    "share": "true"
  },
  "FileFormName": "data",
  "URL": "http://files.bludood.com/s/{json:shareId}"
}
Make sure to replace <generated API token> with your actual API token, and http://files.bludood.com with the URL of your BluFiles instance.
Now you can configure ShareX to use this custom uploader:
- Select your custom uploader as the Destination -> Image/File uploader
- Enable "Upload image to host" in "After capture tasks"
- Enable "Copy URL to Clipboard" in "After upload tasks"
With this configuration, you can easily upload screenshots and other files using ShareX, and the share link will be automatically copied to your clipboard after uploading.